Sewage Disposal Systems
Working together for a healthier tomorrow!
Craig P. Umbel, LEHS
Director of Environmental Health
Room 102
Phone: 301-334-7760
FAX: 301-334-7769
E-Mail: environmental.health
@maryland.gov
Hours of Operation:
Mon. - Fri. 8:00am – 4:30pm
Construction of Individual Subsurface Sewage Disposal Systems
Introduction
Before construction of a dwelling may begin or a mobile home may be moved on to any property in Garrett County, a permit to install a sewage disposal system must be obtained from ENVIRONMENTAL HEALTH SERVICES.
Designing and installing a sewage disposal system depends on several factors, such as slope of land, percolation rate, size of dwelling, soil characteristics and actual size of the proposed system.
General Requirements
This department will conduct percolation tests and a soil evaluation. If the soil is found to be suitable for sewage disposal a Sewage Disposal Permit; specifying design criteria such as septic tank size, total drainage trench length, etc.; may be issued.
A sewage disposal system on a new lot within Garrett County must meet the following specifications:
- A minimum 10,000 square foot area is to be reserved for sewage disposal. This sewage disposal area will be shown on a plat or site plan that will accompany the sewage disposal permit. No other construction is to take place in the sewage disposal area.
- The original sewage disposal system should be installed in the upper one third of the sewage disposal area. The remaining two-thirds of the sewage disposal area is the back-up area in which repairs to, or replacements of the original system can be made.
- Install systems during periods of dry weather to prevent smearing and sealing of drainage trench sidewalls that will effect percolation of sewage into the soil.
- All waste from toilets, sinks, bathtubs, showers, and laundry appliances must discharge into the septic tank.
- Surface water from roofs, footer drains, etc. must not discharge into the septic tank.
- Surface water should be directed away from the drainage field.
- Separation requirements from sewage disposal system to:
- Foundations 10 feet
- Foundation down slope 25 feet
- Property lines 10 feet
- Steep slopes (over 25%) 25 feet
- Drainage ways, gullies 25 feet
- Spring seeps 25 feet
- Potable water wells 100 feet
- Streams not a tributary to water
- Supply reservoirs 100 feet
- Water bodies not serving as
- Potable water supplies 100 feet
- Streams that are tributary to
- Water supply reservoirs 200 feet
- When constructing near Deep Creek Lake, no part of the septic system may be installed within 100 feet of the high water (2462 feet) elevation of the lake.
- No part of the sewage system may be covered or used until it has been inspected and approved by the Health Department. Notify Environmental Health Services at least 24 hours in advance of when you plan to backfill.
Design Criteria
(See toggle below.)
Fees
Application Fee for Percolation Test $200.00
Permit and Final Inspection Fee $75.00
Total: $275.00
Assistance
If during the installation of the septic system difficulties should arise, call Environmental Health Services for assistance. There is no charge for this service.
Final Inspection
No part of the sewage disposal system may be covered or used until the system has been inspected and approved by the Health Department. Notify Environmental Health Services 24 hours in advance of when you plan to backfill.
Maintenance
Septic tanks are designed and sized to provide sufficient time for solids to settle out so only liquids are discharged into the drainage trenches. In time, solids will build up in the septic tank thereby reducing its efficiency in allowing solids to settle. Those solid then pass into the drainage trenches. If solids are permitted to accumulate to a very high level, the possibility exists for the system to become clogged and sewage may back up into the dwelling and/or break out on the ground surface. When either of these conditions occurs, expensive repairs may be required. Therefore, it is recommended that homeowners have their septic tanks pumped to remove solids, every five years. It is further recommended that homeowners reduce to a minimum the number of solids that are placed into their sewage disposal system.
Conclusion
Your septic system is an important and costly part of the construction of your home that will be used for many, many years. The preceding recommendations are made to insure that the system installed is the best available at the time of installation. If the system is not abused and is properly maintained, it should perform trouble free for many years.
Conventional On-Site Sewage Disposal Specification Sheet:
The On-Site Sewage Disposal Specification sheet is for conventional systems only and must be filled out completely and submitted, along with a site plan, when applying for a septic permit.
April 2024 Training:
Environmental Health provides updates on the application process and requirements for conventional on-site sewage disposal systems. This presentation is recommended for installers and contractors.
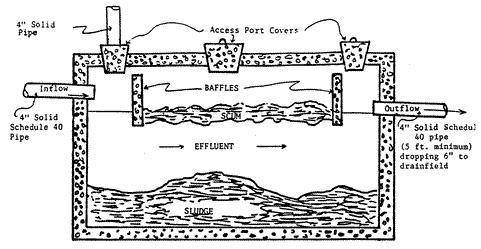
Septic Tank - Cross Section
Design Criteria
- The proper sized septic tank (or larger) as specified on the Sewage Disposal Permit must be installed as level as possible.
- The septic tank must have baffles at both ends.
- The cover on the inlet end of the septic tank must be fitted with an inspection port which is to be constructed of 4 inch or larger solid pipe. This inspection port must have a watertight cover and may be flush with the ground surface or may extend above the ground surface a minimum of 8 inches.
- A minimum of one foot of fill should be placed over the septic tank.
- A watertight manhole, with a minimum diameter of 18 inches, extending to the surface with a watertight cover, must be constructed over the center access port of the septic tank.
- Four inch Schedule 40 solid pipe is required to carry sewage from the house to the septic tank.
- A minimum of 5 feet of four-inch schedule 40 pipe is required from the septic tank to the drainfield. Soil should be placed carefully and packed around the 4-inch pipe from the septic tank to the drainfield to reduce the possibility of pipe sag or breakage. Schedule 40 pipe will reduce the possibility of pipe sag or breakage.
- If there is no built-in gasket in the septic tank inlet and outlet, a quick setting, non-shrinking grouting material should be used. Cement shrinks and cracks and, therefore, does not do a good job.
Drainfield Trench - Cross Section
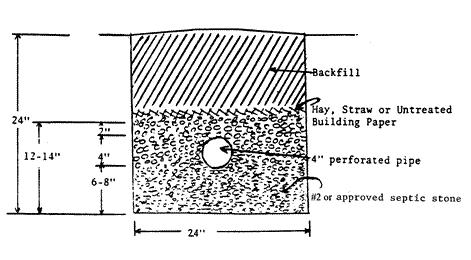
- Length – specified in permit (crossovers are not counted)
NOTE: Approximately 4 inches in drain field length are lost for every two pieces of perforated pipe joined together. This equals a loss of 3 feet in length per 100 feet installed. - Depth – 2 feet (unless otherwise specified).
- Width – 2 feet.
- Maximum slope of trenches – 4 inches per 100 feet.
- Minimum trench separation (center to center) – 8 feet (10 feet is recommended).
- Stone used in drainage trenches must be #2 or #57 (#6) screened stone without fines. (Crusher run is unacceptable.) The suggested gravel or rock size is ¾ or 2 ½ in. (1.8 to 6.4 cm) in diameter. The rock should be durable and resistant to slaking and dissolution. A hardness of 3 or greater on the Moh’s Scale of Hardness is suggested. Rock that can scratch a copper penny without leaving any residual rock meets this criterion. The media should be washed to remove all fines that could clog the infiltrative surface.
- A minimum of 6 inches of gravel must be placed under the 4 inch perforated drainage pipe. This 4-inch pipe must then be covered by a minimum of 2 inches of gravel, which results in a minimum of 12 inches of gravel in each drainage trench.
- Only one line of 4 inch perforated pipe is to be placed in each trench. Pipe perforations should face down.
- Before backfilling, a strip of untreated building paper, hay or straw the width of the trench must be placed on top of the gravel. This will prevent soil infiltration when backfilling.
- If a sewage disposal system is to be installed on sloped land, a CROSSOVER SYSTEM OR A STANDPIPE SYSTEM should be installed.
- On flat land a CLOSED LOOP SYSTEM or DISTRIBUTION BOX SYSTEM should be installed. Contact Environmental Health Services for instructions.
Crossover Systems - (use on slopes)
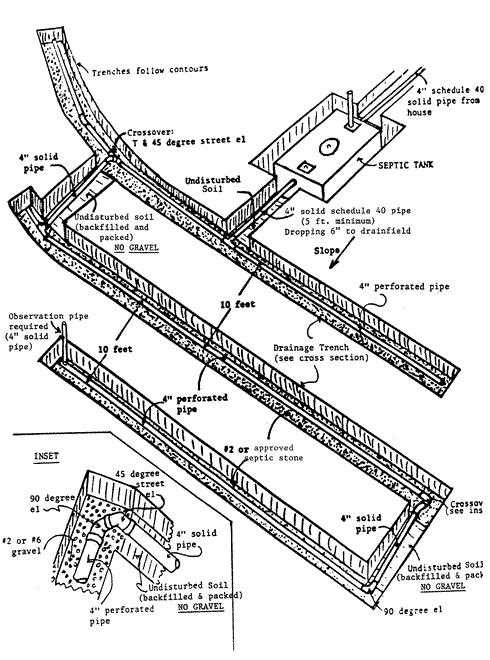
- It is important to have sufficient drop in the line from the tank to the first drainage trench to prevent the back up of effluent into the tank before the effluent can flow over the first crossover.
- Crossovers must be constructed, in undisturbed soil, of solid non-perforated pipe.
- The most impermeable soil available (i.e. – clay) must then be packed around these crossover pipes.
- Under no circumstances shall gravel be placed in the crossover trench.
- Crossovers should be constructed high enough to insure that sewage fills the entire trench to a depth of 12 inches before overflowing through the crossover to the next trench.
- A 4-inch observation pipe should be installed at the end of the drainage trench. The pipe would extend to the surface of the ground and be capped.
Stand Pipe System - (use on slopes)
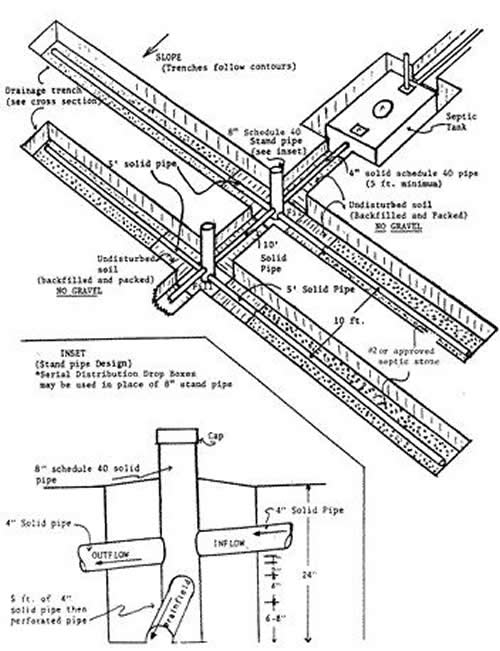
- Standpipe systems are recommended when large amounts of drainage trench are required.
- It is important to have sufficient drop in the line from the tank to the first standpipe to prevent the back up of effluent into the tank before the effluent can flow through the standpipe outlet.
- Standpipes should be positioned to insure that sewage fills both lateral drainage trenches before sewage overflows into the next standpipe.
- Standpipes should be constructed of 8-inch Schedule 40 pipe or precast concrete. (Plastic boxes are also available.)
- Standpipes may be flush with the ground or if extended above grade, should extend a minimum of 8 inches.
- Standpipes should have a watertight cap that can be removed to conduct inspections.
- The bottom of the standpipe outlet should be installed one inch lower than the bottom of the standpipe inlet.
- The top of the lateral lines should be installed 2 inches lower than the bottom of the outlet pipe.
- Five feet of solid pipe surrounded by packed clay should extend out the lateral sides of the standpipe before the use of perforated pipe begins. Under no circumstances should gravel be used in this section of the trench.
- Laterals must be separated (center to center) a minimum of 8 feet. (10 feet is recommended).
¿Prefieres español?
Language Assistance
LanguageLine services are available.
Spanish (Medical Spanish) interpreter available in-person, upon request.


